
Although the operations of common 3D printers in the market are almost the same, basically they are divided into the following parts: leveling of the printing platform, firm bonding of the model, prevention of edge warping, introduction and replacement of printing materials, accuracy control of the printing model, and troubleshooting of the printing process, but listening more does not mean that you will get more. Although we can understand these words, few people know how to deal with their specific operation details in the actual operation process. Today, I will explain these operation details to you.
The Leveling Of 3d printing Platform
The common frame desktop level FDM 3D printers, whether personal assembly machines or mass production sizing machines, are basically adjusted by the four corners of the printing platform (hot bed). Some models may also need to add self leveling devices and modules.
The greater the distance between the printing platform and the printing nozzle, the more smoothly the wire is discharged, but it is easy to make it difficult to bond to the platform; The smaller the distance between the printing platform and the printing nozzle, the more difficult it is to discharge the material, and the more closely the model is bonded. The printing platform whose four corners are perfectly leveled can ensure that the first layer of the printing model is firmly bonded to the platform and is not easy to warp.
Adjust the screws at the four corners to see the printing platform rise or fall. First rough adjustment and then fine adjustment. Use a business card or A4 paper to test the distance between the printing platform and the printing head at four corners. If there is a slight obstacle, it can be drawn out. You can try to print a slice to see whether the first layer is uniform and the thickness of the four sides is consistent.
The Model Shall Be Firmly Bonded And The Edge Warping Shall Be Prevented
The Model Is Firmly Bonded
Whether the printing model is firmly bonded depends on the distance between the printing nozzle and the printing platform, the cleanliness of the printing platform and other factors. The bonding effect can be increased by smearing wood glue and other methods. Here are some common methods used by 3d printing enthusiasts:
(1) Polyimide Tape (Gold Finger Tape)
The 3D printer often sticks a layer of polyimide tape on the surface of the hot bed, which can resist high temperature and print ABS and PLA. When the tape is used, the bottom of the printed piece is very smooth, and the printed piece is easy to remove. When removing the print, it will not damage the print and tape, and can be used continuously.
(2) Masking Tape
It is also common to use masking paper on the hot bed surface of 3D printers. This kind of tape can withstand high temperatures, and the printed pieces can be bonded well. It is cheap and easy to replace. However, when using masking tape, the print bottom is slightly rough. Pay attention not to overlap too much between the two masking tape during bonding, otherwise the nozzle may be scratched.
(3) Use Hair Glue, Hand Spray Glue, Hand White Latex Glue And Other Glues
The printing platform made of glass, aluminum plate and thin copper plate can use hair gel to improve the adhesion of the printed pieces, even when printing PLA, heating is not required. But it should be noted that when choosing hair gel, you must choose the one with high viscosity.
Some people also use Super77 hand spray glue. When using hand spray glue, pay attention to cover the lead screw with newspaper and paper to prevent it from being sprayed on the optical axis of the lead screw. When taking down the model, glue remover can be used, which can be found in the hardware decoration market.
Prevent Edge Warping
- The leveling of the four corners is particularly important to prevent warping.
- ABS shall be avoided as far as possible, and PLA is better.
- Select the appropriate attachment type of the platform in the slicing software settings, increase the contact area between the model and the heating platform, and prevent the edge warping of the print.
- Use various bonding materials to increase the bonding effect.
3D Printing Material Import And Replacement
The introduction of printing materials is also called “feeding” or “wire feeding”. Printing materials have different diameters, most of which are 1.75mm and 3mm. The following matters shall be paid attention to when importing or replacing materials:
(1) Determine Materials
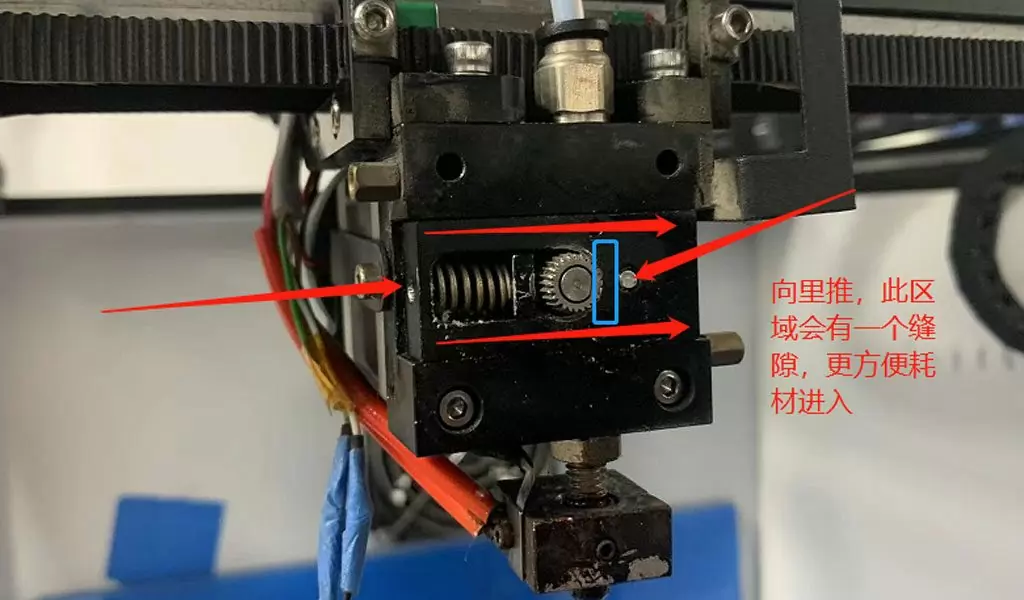
It is necessary to determine whether the diameter of the material used corresponds to the machine. Before wire feeding, it is necessary to sharpen the top of the wire to facilitate wire feeding.
(2) 3D Printer Preheating
Take PLA material as an example, the print head is preheated to 190 ℃, the print platform is preheated to 45 ℃ to 60 ℃, and the material can be fed only after the print head reaches the temperature of the print material, otherwise the plug and wire feeding gear will be damaged.
After the LCD display reaches the preset temperature, click “Load” (feeding or importing), and the printing material will enter the print head with the operation of the gear. The printing material will be extruded like popcorn, and it can be stopped after a certain length is extruded properly. On the one hand, the original material will be extruded to avoid color mixing; On the other hand, test the smooth degree of silk production. If the extrusion is not smooth, increase the temperature of the print head.
(3) Replacement Of Materials
The process of wire feeding is the same, and the print head needs to be preheated in advance. The difference is that many machines have the Unload function, which can also manually pull out materials. When replacing materials manually, pay attention to sending them forward, and then quickly withdraw them, otherwise the materials will be blocked in the material conduit due to the temperature drop after passing through the print head. Readers who are willing to try to print mixed color models can pause printing during the printing process and change to another color to experience printing models of different colors with a single nozzle.
(4) Adjustment Of Material Rack And Tray
You can print and make the material rack by yourself, so that the movement of the material tray is more smooth, without resistance, and to prevent jamming.
Wires that have not been used for a long time are easy to get entangled, and it is easy to stop and jam during the printing process. As a result, only half of the printouts that have been hard printed for several hours are printed. The solution is to open the winding wire and rewind the reel neatly in one direction.
Assembly Matching Figure Tolerance
If the printed objects are models that need to be assembled, such as the matching of screws, nuts and gears, due to the thermal expansion and cold contraction of plastics during the printing process and the expanded edges produced by the bottom printing, the tolerance needs to be enlarged a little. Generally, the tolerance is set to 0.4mm (similar to the nozzle)