
In the realm of mechanical engineering and construction, the cohesion of various components is paramount. Among the unsung heroes facilitating this cohesion are stud bolts. These unassuming yet critical components play an essential role in joining mechanical structures and ensuring their integrity. This article takes an in-depth look at stud bolts, exploring their definition, types, materials, installation methods, and diverse applications across industries.
View More Articles:
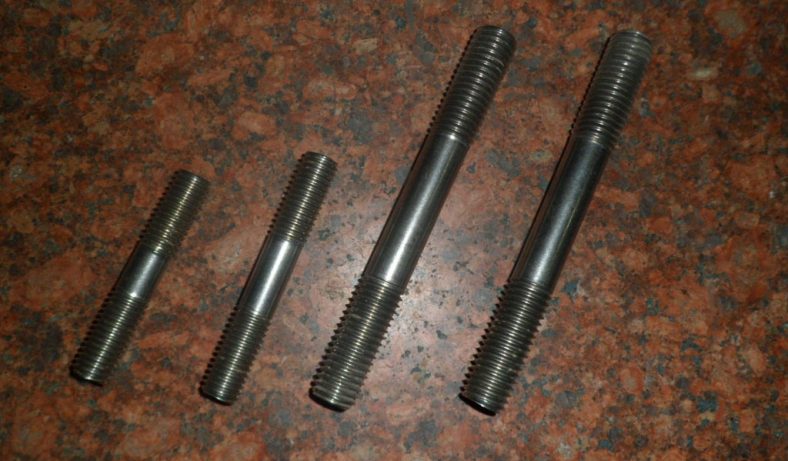
Understanding Stud Bolts: Definition and Function
Stud bolts are threaded fasteners that play a fundamental role in mechanically joining two or more components together. These unassuming yet crucial components are designed to provide a reliable and robust connection, ensuring the integrity and stability of mechanical assemblies. Stud bolts differ from regular bolts in that they have threads on both ends, allowing them to be screwed into different components simultaneously.
Function of Stud Bolts:
The primary function of stud bolts is to provide a means of creating a secure and rigid connection between components that need to be held together. They act as a bridge, maintaining the required distance between the joined parts while accommodating the need for tightening and load distribution. Unlike regular bolts, which are threaded on one end and require a corresponding threaded hole in the mating component, stud bolts have threads on both ends. This unique design allows for versatile applications and can simplify the assembly process, particularly in cases where the components being joined are difficult to access from both sides.
Stud bolts are often used in conjunction with nuts and washers. The threaded ends of the stud bolt are inserted through holes or openings in the components to be joined. Nuts are then threaded onto these ends, and tightening the nuts secures the components together. This threading arrangement enhances the ability to control the level of tightening force and ensures that the load is distributed evenly across the connected parts.
Importance in Mechanical Assemblies:
Stud bolts are of paramount importance in mechanical assemblies for several reasons:
- Structural Integrity: Mechanical assemblies, whether they are part of industrial equipment, machinery, pipelines, or structures, rely on stud bolts to maintain structural integrity. The reliable connection provided by stud bolts prevents loosening or separation due to vibrations, dynamic loads, and other forces.
- Ease of Assembly: The threaded design of stud bolts simplifies the assembly process, especially when joining components that are not easily accessible from both sides. By screwing the stud bolts into one component, and then securing the connection with nuts on the opposite end, assembly becomes more convenient and efficient.
- Maintenance and Repairs: In scenarios where components need to be disassembled for maintenance, repairs, or replacements, stud bolts offer an advantage. With regular bolts, removal often requires accessing the backside of the joint, which can be challenging. Stud bolts eliminate this issue by allowing the components to be separated from one side only.
- Uniform Load Distribution: Stud bolts help evenly distribute loads and stresses across the connected parts. This is especially crucial in applications where accurate load distribution is essential for preventing uneven wear, fatigue, and premature failure.
- Enhanced Safety: The secure and stable connections facilitated by stud bolts contribute to the safety of machinery, structures, and equipment. Reliable joints prevent unexpected failures that could lead to accidents, downtime, or even catastrophic events.
- Versatility: Stud bolts find applications in a wide range of industries, including construction, manufacturing, oil and gas, aerospace, automotive, and more. Their versatility stems from the ability to customize stud bolt specifications according to the specific requirements of each application.
Stud bolts are unassuming yet indispensable components that form the backbone of mechanical assemblies. By providing reliable connections, simplifying assembly and maintenance processes, ensuring load distribution, and enhancing safety, stud bolts contribute significantly to the efficiency, longevity, and functionality of various mechanical structures and systems.
Types of Stud Bolts: Continuous Thread, Double-End, and Tap-End
Stud bolts come in various configurations, each designed to cater to specific applications and assembly requirements. The three primary types of stud bolts are continuous thread stud bolts, double-end stud bolts, and tap-end stud bolts.
1. Continuous Thread Stud Bolts:
Continuous thread stud bolts, often referred to simply as “threaded studs,” are one of the most common types of stud bolts. These stud bolts have threads running along the entire length of the shaft, providing a uniform and continuous threading pattern. The threading starts from one end of the stud bolt and continues all the way to the other end.
Advantages:
- Versatility: Continuous thread stud bolts are versatile and can be easily cut to the desired length, making them suitable for various applications.
- Simplified Assembly: The continuous threading allows for easy insertion into components and provides consistent engagement with nuts and other fasteners.
- Load Distribution: The uniform threading along the entire length ensures even distribution of loads and stresses.
2. Double-End Stud Bolts:
Double-end stud bolts, also known as “double-ended studs” or “fully threaded studs,” have threads on both ends. This design facilitates simultaneous attachment of components on both sides, enabling efficient assembly and disassembly.
Advantages:
- Time Efficiency: Double-end stud bolts streamline the assembly process, as components can be secured on both sides without needing to thread a nut from the back.
- Maintenance Convenience: When disassembly is required, both ends of the stud bolt can be accessed for easy removal.
- Uniform Tension: Both ends of the stud bolt contribute to load distribution, ensuring a balanced and uniform connection.
3. Tap-End Stud Bolts:
Tap-end stud bolts have a threaded end and an unthreaded end with a reduced diameter, known as the “tap end.” The threaded portion typically has a coarse thread, while the unthreaded tap end facilitates easier alignment during assembly.
Advantages:
- Alignment Aid: The unthreaded tap end assists in aligning the stud bolt with the tapped hole or nut, preventing cross-threading and making assembly smoother.
- Vibration Resistance: The unthreaded portion reduces the risk of the stud bolt loosening due to vibrations and dynamic forces.
Each type of stud bolt serves distinct purposes, and the choice depends on the specific application, assembly process, and desired load distribution. Whether it’s the continuous threading of the continuous thread stud bolt, the dual-threaded convenience of the double-end stud bolt, or the alignment assistance of the tap-end stud bolt, selecting the appropriate type ensures a secure and reliable connection in various mechanical assemblies.
Materials Used for Stud Bolts: Carbon Steel, Alloy Steel, Stainless Steel, and Non-Ferrous
The choice of material for stud bolts is critical as it directly impacts the stud bolt’s performance, durability, and suitability for specific applications. Different industries and environments require varying levels of corrosion resistance, strength, and temperature tolerance. Here, we explore the four main categories of stud bolt materials: carbon steel, alloy steel, stainless steel, and non-ferrous metals.
1. Carbon Steel Stud Bolts:
Carbon steel is one of the most common and cost-effective materials used for stud bolts. It contains primarily iron and carbon, with other elements present in smaller amounts. Carbon steel stud bolts are suitable for a wide range of applications where moderate strength and corrosion resistance are required.
Advantages:
- Cost-Effective: Carbon steel is generally more affordable compared to other materials, making it a popular choice for projects with budget constraints.
- Strength: Carbon steel stud bolts offer good tensile strength, making them suitable for applications with moderate loads.
2. Alloy Steel Stud Bolts:
Alloy steel stud bolts are composed of iron and various alloying elements, such as chromium, nickel, molybdenum, and vanadium. These alloying elements enhance the material’s mechanical properties, including strength, toughness, and corrosion resistance.
Advantages:
- Enhanced Strength: Alloying elements significantly boost the strength and hardness of alloy steel stud bolts, allowing them to withstand higher loads.
- Corrosion Resistance: Depending on the alloy composition, alloy steel stud bolts can exhibit improved resistance to corrosion and oxidation.
3. Stainless Steel Stud Bolts:
Stainless steel stud bolts are known for their excellent corrosion resistance and aesthetic appeal. They are composed of iron, chromium, and often other elements like nickel or molybdenum. The addition of chromium creates a passive layer that protects the surface from corrosion.
Advantages:
- Corrosion Resistance: Stainless steel stud bolts are highly resistant to corrosion, making them suitable for applications exposed to harsh environments, chemicals, and moisture.
- Aesthetic Appeal: The polished and lustrous appearance of stainless steel stud bolts makes them ideal for visible and decorative applications.
4. Non-Ferrous Stud Bolts:
Non-ferrous metals, such as brass, bronze, and aluminum, are used for stud bolts in specific applications where corrosion resistance and other unique properties are required. Non-ferrous stud bolts are often chosen for their electrical conductivity, malleability, and aesthetic qualities.
Advantages:
- Corrosion Resistance: Non-ferrous metals are inherently resistant to rust and corrosion, making them suitable for applications in corrosive environments.
- Electrical Conductivity: Some non-ferrous metals, like brass, have good electrical conductivity, making them suitable for electrical applications.
The choice of stud bolt material should take into account the specific environmental conditions, loads, and functional requirements of the application. While carbon steel offers affordability, alloy steel, stainless steel, and non-ferrous metals provide varying levels of strength and corrosion resistance. By selecting the right material, engineers and designers can ensure that stud bolts effectively contribute to the overall performance and longevity of mechanical assemblies.
Installation of Stud Bolts: Pre-Installation Considerations, Step-by-Step Installation Process, Torque vs. Tension
Proper installation of stud bolts is essential to ensure the reliability and integrity of mechanical connections. From pre-installation considerations to selecting the appropriate tightening technique, each step plays a crucial role in achieving a secure and durable joint.
1. Pre-Installation Considerations:
Before installing stud bolts, several factors need to be considered:
- Load Requirements: Determine the expected loads, forces, and stresses that the stud bolts will experience during operation. This helps in selecting the appropriate stud bolt material, diameter, and thread pitch.
- Environmental Conditions: Consider the environment in which the stud bolts will operate. Factors such as temperature, humidity, chemicals, and corrosive substances can impact the choice of material and the need for additional coatings.
- Assembly Sequence: Plan the order of component assembly to ensure that stud bolts can be threaded into position without obstructions. This is particularly important when using continuous thread or double-end stud bolts.
- Thread Lubrication: Applying an appropriate thread lubricant can reduce friction during tightening and improve the accuracy of torque or tension application.
2. Step-by-Step Installation Process:
Here is a general step-by-step guide for installing stud bolts:
- Prepare Components: Ensure that the components to be joined are clean, properly aligned, and free from debris or contaminants.
- Thread Stud Bolts: Thread the stud bolts into the designated holes or openings on the first component. For double-end stud bolts, thread the appropriate length on each end.
- Insert Nuts: Place nuts onto the threaded ends of the stud bolts. If using continuous thread or double-end stud bolts, make sure there is enough clearance for the nuts to be threaded without obstruction.
- Tighten Nuts: Begin tightening the nuts alternately and gradually on each end. Use a wrench or torque tool to achieve the desired level of tightness.
3. Torque vs. Tension: Tightening Techniques:
There are two primary methods for tightening stud bolts: torque tightening and tension tightening. Each technique has its advantages and considerations.
Torque Tightening: This method involves applying a specific amount of torque (rotational force) to the nut, which creates tension in the stud bolt. Torque specifications are provided by manufacturers and are based on factors such as stud bolt size, material, and thread condition. Torque wrenches are commonly used to achieve the specified torque.
Advantages:
- Relatively straightforward and commonly used.
- Suitable for applications with limited access.
Considerations:
- Friction between threads and components can affect torque accuracy.
- Torque specifications might not account for variations in friction.
Tension Tightening: Tension tightening involves applying a specific level of tension directly to the stud bolt. This technique directly controls the tension in the bolt rather than relying on the torque required to achieve it. Tensioning tools, such as hydraulic tensioners, are used for accurate tension control.Advantages:
- Provides more accurate and consistent tension control.
- Minimizes the impact of friction variations.
Considerations:
- Requires specialized tensioning equipment.
- Load distribution across multiple bolts might vary.
The choice between torque and tension tightening depends on the application requirements, available tools, and desired level of accuracy. In critical applications, tension tightening is often preferred for its higher accuracy and better control over the preload applied to the stud bolts.
The proper installation of stud bolts involves careful consideration of load requirements, environmental conditions, and the choice between torque and tension tightening techniques. By following a systematic installation process and adhering to manufacturer specifications, engineers can ensure that stud bolts provide the desired level of joint integrity and performance in various mechanical assemblies.
Stud Bolts in Flange Connections: Role in Flange Joints, Flange Types and Applications, Importance of Gasket Selection
Flange connections are a prevalent feature in industries where pipelines, equipment, and structural components need to be joined securely. Stud bolts play a crucial role in these flange joints, ensuring the integrity of the connection and preventing leaks. This section explores the various aspects of stud bolts in flange connections, including their role, flange types, and the significance of gasket selection.
Role of Stud Bolts in Flange Joints:
Flange joints involve the connection of two components by placing a gasket between their flange faces and securing them using stud bolts and nuts. The role of stud bolts in this context is to provide the necessary axial force that compresses the gasket, creating a tight and leak-free seal between the components. This axial force, known as preload, ensures that the gasket is sufficiently compressed to prevent the escape of fluids or gases under operating conditions.
Stud bolts create tension when tightened, and this tension is transferred to the gasket through the flange faces. As the gasket compresses, it forms a seal that prevents leakage at the joint. The preload in the stud bolts counteracts the forces that tend to separate the flange faces due to internal pressure, thermal expansion, or other external loads.
Flange Types and Applications:
Flanges come in a variety of types and designs, each suited for specific applications and requirements. Some common types of flanges include:
- Weld Neck Flanges: These flanges have a neck that is welded to the pipe, providing high structural strength and resistance to deformation. They are often used in high-pressure and high-temperature applications.
- Slip-On Flanges: Slip-on flanges slide over the pipe and are then welded in place. They are easier to align and install but are not suitable for high-pressure applications.
- Blind Flanges: Blind flanges are used to close the end of a pipeline or vessel, preventing flow and providing easy access for inspection or maintenance.
- Socket Weld Flanges: These flanges are similar to slip-on flanges but have a socket for the pipe to fit into. They are used for smaller pipes and high-pressure applications.
- Threaded Flanges: Threaded flanges have internal threads that match the external threads of pipes. They are used in low-pressure applications and where welding is not desired.
Importance of Gasket Selection:
Gaskets are crucial components in flange connections as they provide the sealing element between the flange faces. The choice of gasket material depends on factors such as the type of fluid or gas being conveyed, operating temperature, pressure, and compatibility with the flange and pipe materials.
Different gasket materials offer varying levels of chemical resistance, temperature tolerance, and resilience to compression. Common gasket materials include rubber, elastomers, PTFE (Teflon), graphite, and metal. Proper gasket selection is essential to prevent leaks and maintain the integrity of the joint.
Stud bolts are integral to the functioning of flange connections, ensuring a secure and leak-free joint by maintaining the compression of gaskets. By understanding the role of stud bolts, the various types of flanges, and the importance of gasket selection, engineers and technicians can design and assemble flange joints that meet the performance requirements of diverse industries and applications.
How to Remove Stud Bolts: Methods and Techniques
Removing stud bolts can be a challenging task, especially when they have been in place for a long time or are subjected to corrosive environments. However, there are several effective methods and techniques that can be employed to safely and efficiently remove stud bolts. Here are some approaches to consider:
1. Removal with Double Nuts:
Using double nuts is a common method for removing stud bolts. Follow these steps:
- Thread on the Second Nut: Thread a second nut onto the stud bolt, leaving a small gap between the two nuts.
- Tighten the Nuts Together: Use two wrenches to tighten the two nuts against each other. The friction between the nuts can help break the stud bolt loose.
- Turn the Bottom Nut: While holding the top nut with one wrench, turn the bottom nut counterclockwise to loosen the stud bolt. The top nut prevents the bottom nut from turning on the stud bolt.
2. Use of Stud Bolt-Specific Tools:
There are specialized tools designed to grip and remove stud bolts more effectively. Some common tools include stud extractors and stud removers. These tools provide enhanced grip on the stud and can be more efficient than traditional wrenches.
3. Use of Penetrating Lubricant:
Applying a penetrating lubricant to the threads of the stud bolt can help loosen rust and corrosion, making removal easier. Follow these steps:
- Apply Penetrating Lubricant: Spray or apply a penetrating lubricant such as WD-40 or PB Blaster onto the threads of the stud bolt. Allow the lubricant to penetrate for a period of time (according to the manufacturer’s instructions).
- Attempt Removal: After the lubricant has had time to work, use a wrench or stud-specific tool to attempt to turn the stud bolt counterclockwise for removal.
4. Apply Heat to the Surrounding Area:
Heat can help expand the metal surrounding the stud bolt, potentially breaking rust or corrosion bonds and making removal easier. Here’s how:
- Use a Heat Source: Apply heat to the area surrounding the stud bolt using a propane torch or other suitable heat source. Heat the surrounding metal evenly.
- Attempt Removal: After applying heat, use a wrench or stud-specific tool to turn the stud bolt counterclockwise for removal. Be cautious not to overheat the area, as excessive heat can cause damage.
It’s important to exercise caution when using heat or force during stud bolt removal, as excessive force or heat can lead to damage or injury. If a stud bolt is particularly stubborn or if the removal process becomes difficult, it might be advisable to seek professional assistance to avoid causing further damage.
Stud bolt removal can be achieved using various methods and techniques. The choice of method depends on factors such as the level of corrosion, accessibility, and available tools. Applying lubricant, using double nuts, employing specialized tools, and using heat are all viable approaches to safely and effectively remove stud bolts from mechanical assemblies.
How To Handle Broken Stud Bolts?
Handling broken stud bolts can be a challenging task, especially if the breakage occurs deep within a component or in a critical application. Proper techniques and tools are necessary to ensure the broken stud is safely and effectively removed without causing further damage. Here are the steps to handle broken stud bolts:
1. Assess the Situation
Before attempting any removal, assess the situation to understand the extent of the breakage, the location of the broken stud, and the surrounding components.
2. Gather Necessary Tools and Equipment
Ensure you have the appropriate tools and equipment for the job, including:
- Stud Extractor or Remover: A specialized tool designed to grip onto the broken stud and allow for removal.
- Penetrating Lubricant: Helps to loosen rust and corrosion around the broken stud.
- Heat Source: Propane torch or heat gun to apply controlled heat to the area.
- Wrenches and Sockets: For turning and manipulating tools.
- Safety Gear: Gloves, safety glasses, and protective clothing.
3. Apply Penetrating Lubricant
Spray or apply a penetrating lubricant around the broken stud. Allow it to penetrate for the recommended amount of time, as specified by the manufacturer.
4. Use a Stud Extractor
A stud extractor is a specialized tool designed to grip onto the broken stud and turn it counterclockwise for removal. Follow these steps:
- Insert the extractor into the drilled hole.
- Turn the extractor counterclockwise using a wrench or socket, applying steady and controlled force.
- The extractor’s grip should dig into the broken stud, allowing you to turn it out.
5. Apply Heat
If the stud is stuck due to corrosion, heat can help expand the surrounding metal and break the rust bonds. Use a propane torch or heat gun to apply controlled heat to the area around the broken stud. Avoid overheating and damaging surrounding components.
6. Use a Left-Handed Drill Bit
Another approach is to use a left-handed drill bit that turns counterclockwise. As you drill into the broken stud, the rotation might grip onto the stud and help unscrew it.
7. Weld a Nut
If part of the stud is exposed, welding a nut onto the remaining portion can provide a grip for turning. Be cautious with this method, as excessive heat can damage the surrounding area.
8. Seek Professional Help
If the broken stud is in a critical area, difficult to access, or if your attempts are unsuccessful, it’s wise to seek the assistance of a professional with experience in stud bolt removal.
9. Preventive Measures
To avoid broken stud bolts in the future, consider using anti-seize compounds when installing new studs. These compounds can help prevent corrosion and make future removal easier.
Remember that handling broken stud bolts requires careful consideration, the right tools, and a cautious approach. If you are unsure about how to proceed or if the situation is complex, consulting with professionals who specialize in stud bolt removal is a prudent choice to prevent further complications.